Enjoy 20% off + a Free Pattern!

Aren't freebies the best?! Sign-up for my email list and I'll send a coupon for 20% off one order AND a free quilt block pattern right to your inbox. 
(You can unsubscribe anytime.)

Plus, you'll be the first to know about new products, quilting tutorials, and exclusive discounts like
25% off the Pattern & Bundle of the Month

Sign-up for updates & get 20% off + a Free Pattern!

  • Log in
  • Cart (0)
  • Checkout
  • Blog 
    • Visit the Blog
    • Newsletter Sign-up
  • Fabric 
    • Featured Bundle of the Month
    • All Yardage
    • Fabric Collections 
      • BEST Ombre Confetti by V and Co.
      • NEW! Color Crush by V and Co.
      • Gilded by Alli K.
      • Grunge by BasicGrey
      • I Heart Ombre by V and Co.
      • Moda Bella Solids
      • Ombre by V and Co. (original)
      • Ombre Confetti by V and Co.
      • Ombre Fairy Dust by V and Co.
      • Ombre Flurries by V and Co.
      • Ombre Galaxy Metallic by V and Co.
      • Ombre Wovens by V and Co.
      • Pure Solids by Art Gallery Fabrics
      • Spotted by Zen Chic
      • Thatched by Robin Pickens
      • 108" wide Ombre Confetti Backing Fabric by V and Co.
    • Fabric Designers 
      • BasicGrey
      • Robin Pickens
      • V and Co.
      • Zen Chic
      • Sharon Schamber
    • Precut Bundles 
      • Limited Edition Bundles
      • V & Co Ombre - Precut Bundles
      • Art Gallery Fabrics - Precut Bundles
      • NEW! Fat Eighth Bundles
      • Jelly Rolls
      • Fat Quarter Bundles
      • Half Yard Bundles
      • Hand Dyed Fabric Bundles
    • Quilt Kits
    • Seasonal Bundles & Kits
    • New Fabrics 
      • I Heart Ombre by V & Co.
      • BEST Ombre Confetti by V & Co.
      • AGF Sewcialites Bundles
      • AGF Holiday Bundles
      • AGF Bundle Up Bundles
      • Birthstone Bundles
    • Fabrics by Color 
      • Birthstone Bundles
      • Rainbow
      • Red
      • Pink
      • Coral
      • Orange
      • Yellow
      • Green
      • Aqua
      • Blue
      • Purple
      • Grey/Black
      • Neutral
      • Brown
    • Fabric Manufacturers 
      • Art Gallery Fabrics
      • Moda Fabrics
      • Sharon Schamber - Hand Dyed Fabric
    • Hand Dyed Fabric 
      • Hand Dyed Precuts
      • Hand Dyed Bundles
      • Hand Dyed Scrap Packs
    • All Fabric
    • Coming Soon - Preorder
    • Scrap Bags & Bolt Ends
    • Last Chance Fabrics
    • Destash Clearance Sale!
    • Discontinued Fabrics (all gone)
  • Patterns  
    • Pattern & Bundle of the Month
    • Pattern Designers 
      • A Quilted Life - Krista Moser
      • Alison Glass
      • Cluck Cluck Sew
      • Cristy Fincher
      • Latifah Saafir
      • Laundry Basket Quilts
      • Laura Heine - Fiberworks
      • Lo & Behold Stitchery
      • Lori Holt
      • Modern Handcraft
      • Needle in a Hayestack
      • Pen + Paper Patterns
      • Quilty Love - Emily Dennis
      • Robin Pickens
      • Sharon Schamber
      • Toad & Sew
      • V & Co.
      • Violet Craft
      • Color Girl Quilts
      • Nydia Kehnle
    • New Patterns
    • $6 Quilt Blocks - PDFs
    • Quilt Kits
    • Seasonal Quilt Patterns
    • All Patterns
    • Patterns by Type 
      • Collage Quilts
      • Cross Stitch & Embroidery
      • Curved Piecing
      • English Paper Piecing
      • Foundation Piecing
      • Machine Piecing
      • Tote Bags & Purses
    • Applique 
      • Raw-edge Applique
      • Turned-edge Applique
    • Quilt Binding
    • Printed Quilting Patterns
    • Quilt Designing
    • Quilt Painting
    • Hand-dying Fabric
    • 2019 BOM - The Gardens
    • 2018 BOM - Stellar Stars 
      • Stellar Stars - BOM Pattern
      • Fabric & Thread Kits
      • Stellar Stars BOM Supplies
      • Stellar Stars - Video Tutorials
    • 2017 BOM - Silk Society Stash 
      • Hand Dyed Fabric
      • Applique Patterns
      • Silk Thread Sets
      • Video Tutorials
    • Books
  • Notions 
    • New Notions & Supplies
    • Fun Stuff! 
      • Gifts under $5
      • Gifts under $10
      • Gifts under $15
    • Glue Basting
    • Thread 
      • Konfetti by Wonderfil
      • Cotton Thread
      • Thread Sets
      • Soie Perlee - Embroidery Thread
      • Soie de Paris - Embroidery Floss
      • Specialty Threads
    • Rulers & Cutters
    • Pins & Needles
    • Marking Tools
    • Interfacing & Foundation
    • Pressing Boards & Irons
    • For Machine Quilting
    • For Applique
    • For Curved Piecing
    • For Foundation Piecing
    • For Machine Embroidery
    • For Color & Design
    • Shop by Brand 
      • It's Sew Emma
      • Gypsy Quilter
    • Monthly Clubs
    • Preorder Class Kits
  • Online Courses 
    • Course Login
    • NEW! Free Motion Stipple Designs with Sharon Schamber
    • Unique Feathers with Sharon Schamber
    • Love Machine - Precise Piecing Course
    • Book a Class - Guilds & Groups
  • Free Motion Quilting 
    • Online Courses
    • Machine Quilting Notions
    • Domestic Machine Quilting CDs/DVDs
    • Longarm Machine Quilting CDs/DVDs
    • Longarm Digitized Designs
    • Free Video Tutorials
  • Digitized Designs
Blog
Home   Blog   Piec-lique Circles & Drunkard's Path: Tutorial

Piec-lique Circles & Drunkard's Path: Tutorial

Glue Basting Piec-lique Quilt Blocks Tutorial

August 16, 2013 3 Comments


Piec-lique (pronounced: piece-li-kay) is a technique, developed by Sharon Schamber (my mama), for creating any type of curved seam. More than 10 years ago, She began developing the technique , and published her book, "Piec-lique: Curves the New Way", with AQS, in 2005. For those who have taken classes from my mom, or myself, the technique is often an "Ah-ha!" moment. We've seen eyes light up and minds open to so many possibilities for their sewing and quilting.

Sewing curved seams can be very intimidating. Most of the other techniques, out there, require special feet for your machine, plastic templates, many pins, and/or tic marks. All of which can be costly and tedious. Piec-lique requires none of those. It just needs you to be willing to give it a try.

Once you learn the basics of Piec-lique, you can apply the technique to ANY (yes, ANY) curved seam design in the sewing and quilting world. My mom has developed three ways to use Piec-lique: 1) Inset Curves (like the circle), 2) Layered Curves and 3) Paperless-Paper-Piecing (layered straight lines). You can find more info, and detailed, high quality instruction for all of these methods {here}.

Are you ready? Let's get started!! I know you're going to love this!

First up: Supplies
The Cast of Characters

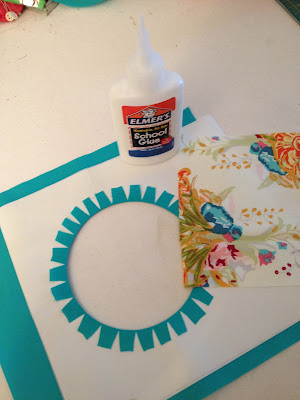
  1. Washable Basting Glue, with a fine tip. I use Elmer's Washable School Glue, and attach {this} fine tip to the top. It gives me the perfect fine line of glue, that I can control and won't get gloppy.
  2. Spray Starch (Regular or Heavy) & a Small Cup or Bowl (I just use the lid, though)
  3. 2 Pieces of Freezer Paper. Renyolds works well**. If you have access to heavier weight freezer paper, that's even better. You can order the heavier from my mom {here}.
  4. Small Stencil or Paint Brush. I generally use a 3/8" stencil brush.
  5. Scissors for Fabric and Paper
  6. Pencil
  7. Rotary Ruler, Cutter & Mat
  8. Iron - Hot and Dry
  9. A Circle Template, or Something to Trace a Circle From
  10. Fabric - Fat Quarters work great: One for the background, and one for the circle.
  11. Sewing Machine, ready to stitch (I'm using a 50wt cotton thread, and 75/11 embroidery needles.)
Step 1: Creating Your Freezer Paper Template Shape

Trace!
Trace, or print (you can print onto freezer paper) the size circle you'd like. I prefer a pencil, if tracing, because I'm paranoid that the ink from a pen will bleed. If you print from a printer, try changing the ink color to a light color to prevent bleeding. The shape only needs to be on one of your pieces of freezer paper.

The circle can be place in the center, or off center, of the paper. We're not worried about it very much. We'll be centering it on the fabric later, using guides we'll create.

Step 2: Preparing Your Freezer Paper Template

Once you have the circle traced and ready, lay both of your pieces of freezer paper on your pressing board, SHINY SIDES DOWN. I can't stress that point enough. If you put shiny sides up, the paper will stick to your iron. If you put shiny sides together, you'll adhere the pieces together, incorrectly, and won't be able to use them for Piec-lique.

You might be wondering why 2 pieces of freezer paper, instead of the typical single piece. Making your template with two pieces makes it much stronger, durable, and reusable. Doubling the layers will let you use the template 5-8 times, easily.


As you're pressing, apply a good amount of pressure to make sure the layers stick, and any bubbles or ripples are flat.

Shiny Sides Down!
After the two layers are pressed together, cut the center of the circle out, leaving the outside frame intact. Be sure to cut with smooth movements. Any bumps or gouges will show up on your fabric, later.


Our circle is cut and ready for the fabric!


Step 3: It's Fabric Time!

Cut a square piece of fabric that is a few inches larger than your circle. My circle is 4" across, so I cut my fabric at 8", but I would have been just fine with 6". We'll true up our block, making it the actual size you'd like, once we're done. You could cut your fabric to size now, but if this is your first time trying Piec-lique, I recommend giving yourself extra to work with.

Lightly starch and press your background fabric.


Finger press center creases into both your background fabric and your circle template. Draw a little line, or mark, on the creases of the circle template. This will help us center the circle, just right. If you want to play around, and off set the circle, go right ahead!

Line up your marks on the background fabric and template. Hold it in place, and press it, shiny side down, with your iron, to the back of your background fabric.


Press the template well, so it completely sticks to your background fabric. You should have no bubbles or bumps.


 Step 4: Cutting Out Your Circle

Next, you'll cut the center of your circle out. This can be a rough-cut. Give yourself at least a 3/8" seam allowance, here. That extra width in the seam allowance will help give you more control when you sew. Once we sew it up, you'll be trimming it off, to make it a nice little 1/4" allowance.

Discard the center that you cut away, or add it into your scrap bin.


Next, clip the inside curve of the circle. We are going to be pressing this up and over the edge of the freezer paper template, and the clipping will allow it to open up, creating a nice smooth circle. When you clip, stop about 2-3 threads/fibers before the freezer paper template. If you clip too close, a pesky little hole will show up on your lovely circle.

Gauge your clipping, so the allowance will turn to make a smooth circle. Too far apart will keep your circle from looking smooth. Too close is hard to manage,when your pressing. Mine is usually 3/8", or a tad smaller, for a circle. The wider the curve, the wider my clipping.


Step 5: Starching the Seam Allowance

Spray some starch into a small cup, or bowl. I usually just use the lid of my starch can. It will probably foam up some. When the foam settles, the liquid will be left.


With your stencil brush, paint some starch along the inside edge of the seam allowance. It should be damp, not heavily wet. Paint it around the entire circle. You also paint on the starch a bit, then iron, then paint on more. Either way is fine.


Step 6: Pressing the Seam Allowance

Be sure your iron is hot and dry. Pull back the little "tabs" of the seam allowance, over the top of the freezer paper. You'll feel when you "hit" the template. Don't pull on the tabs too much, to prevent the freezer paper from folding over, as well.

Press the tabs down, with your iron. Move around the circle, pulling over the tabs, and pressing them down. Slowly and smoothly.


When it's all pressed it will look a lot like the cog of a wheel. You should have a smoothly pressed circle, all the way around.


Step 7: Adding the Circle Fabric

Cut the fabric for the center of your circle. Since my circle is about 4", I cut a 5" square. The square doesn't need to be precise or cut perfectly. It just needs to be bigger than the center circle. I'm using Lilly Belle by Bari J. from Art Gallery Fabrics.


Remove the freezer paper. If you press it lightly with your iron, the wax of the shiny side will warm up, and release more easily.

Draw a fine line of glue around the circle, on the inside edge. See how close the edge I place it?


Place your circle fabric, right side down, and be sure it covers the seam allowance on all sides. Heat-set it in place with your iron.


Now for the big reveal! Turn it over, and take a look at your gorgeous circle!!!


Step 8: Sewing it all Together

Turn your circle back over to the back, and open up the crease you made when you starched and turned  your background. See that crease you made by pressing the allowance over, and against the freezer paper? This is your sewing line! Awesome, right? It's like magic!


Place your circle on your machine, and get ready to do some stitchin'. Be sure that the tabs of the allowance, and the right side of the raw edge of the circle fabric are to the right of the foot. You will be sewing through two layers, just like when you piece normally. Line your needle up with the crease, and begin with your needle down.


Slowly stitch directly on the crease, going around the entire circle. I guide with both hands, using my left to keep the bulk of the background out of the way of the needle. If you catch the background under the needle, you'll get tucks and puckers. I used a 1.8/2 stitch length, here.


When you get back to where you started, backstitch a few stitches.


This is what the seam will look like.


Once it's sewn, trim the allowance down to 1/4".


Turn it over, and press out any creases made from the sewing process. Feel free to starch lightly, if you'd like.


Ta-Da!!!!!!!


Step 9: Truing Up Your Block

To true up our block, we'll be working from the center out. This will give you a much more accurate measurement.

The following instructions are for making a centered and square block. If you'd like to play around with your circle and cut it off center, or make it wonky, go right ahead. There are so many fun things you can do with Piec-lique circles.

First, mark the centers of all four sides. It's a good idea to mark at the edge, and a small mark closer to the circle. Our original mark will be removed, as we cut away the edges. The additional mark, will help us we true it up.


Choose a measurement mark on your cutting mat to center your block on. I chose the 5" mark, but you could choose the 10, or anything you prefer. Lay your marked block on your mat, and line up your verticle marks with the measurement you chose.

Decide how big you want your block to be. I wanted a 5 1/2" block, unfinished, so as I trim, I will be measuring 2 3/4" from the center out, to be sure my block is accurate at the end.

Cut the right side first. Line up your ruler, from the center line, to half of the measurement that you want your unfinished block to be. For example, my block will be 5 1/2", unfinished, and 2 3/4" is half. That will be my mark for cutting. I lined up my center mark to the 2 3/4"measurement on my ruler. Then cut off the side with your cutter.


Next, line up your ruler on the left side of your circle block, going out, from the center, the same measurement you cut before. For mine, I went out from the center 2 3/4". Then cut.

Turn your block around, line up the bottom of your block to a horizonal measurement line, to keep it square. Repeat the measuring and cutting process for the last two sides.


TA-DA!!!!!!!!!!!! You did it!! Once you get the hang of this technique, you'll be making circles, of all sizes, and making them really fast. Now, I can finish one circle in less than 10 minutes.


The Drunkard's Path:

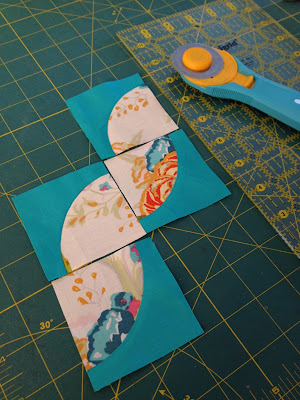
Turning your circle into a Drunkard's Path block is so crazy easy! There are only 2 steps. All you need to to is cut your circle in half, right down the center. Then cut both halves of your circle, in half. And just like magic, you have 4 Drunkard's Path blocks.

So freaking cool!!!


You can make a bunch of different circles, and cut them up to give you some scrappy Drunkard's Path blocks. There are so many layouts you can create with Drunkard's Path. I know you'll have a lot of fun with these blocks!

Thanks for stopping by! I hope you had fun learning Piec-lique.
~Cristy

**A note about freezer paper: If you use Renolyds, or another brand found at a grocery store, it will need to be preshrunk. When ironed, freezer paper shrinks in width (about 1/8"), but not length. Preshrinking it will prevent inaccuracies as you reuse the template. To preshrink your freezer paper, tear off your desired length, lay it shiny side down onto your pressing board. Lightly spray it with spray starch, and press it with a dry (NO steam) iron until it is completely flat and dry. Repeat for your second piece of freezer paper. You'll notice it pulling in on the width. Once it's dry and flat, it's ready to be used. If you order freezer paper from my mom, it doesn't need to be preshrunk.

Tweet Share Pin It Email

3 Responses

Cora Latos
Cora Latos

October 28, 2021

I was truly blessed to take Sharon’s class many, many, many years ago.. I would be so happy to take all of her classes again, just for the shear joy I had in her class ! Thank you !

Deborah Montgomery
Deborah Montgomery

April 22, 2020

Awesome instructions – very clear and concise! I’m just starting to learn quilting and want to make the drunkards path quilt design! Thanks sooo much for your instructions!

barb vedder
barb vedder

September 02, 2018

thanks! this is an awesome tutorial and I just linked it on my blog today.

Leave a comment

Comments will be approved before showing up.


Also in Blog

Tariffs
My promise: Honesty, Support, & Stability through Tariff Changes

April 28, 2025

Have you been wondering about the what type of impact the new tariffs (coming May 1st) will have on your favorite quilting fabrics and supplies? There's a lot of info being thrown around and a lot of it can sound, well, scary. To give you some reassurance, let's have a chat about what I know and what you can expect from me and Purple Daisies Quilting…

Continue Reading

Prismatic Points - Sparkle Themed Quilt Block
Blog Hopping Machine Piecing Paper Piecing Quilt Block Mania Quilt Blocks Star Quilt Block
Prismatic Points - Sparkle Themed Quilt Block

December 03, 2024 1 Comment

Continue Reading

Flower Shop - Shop/Market Themed Quilt Block
Blog Hopping Machine Piecing Quilt Block Mania Quilt Blocks
Flower Shop - Shop/Market Themed Quilt Block

November 05, 2024

Continue Reading

Subscribe

+Recent Articles

  • My promise: Honesty, Support, & Stability through Tariff Changes
    April 28, 2025
  • Prismatic Points - Sparkle Themed Quilt Block
    December 03, 2024
  • Flower Shop - Shop/Market Themed Quilt Block
    November 05, 2024
  • Sweet Slice - Sweets Themed Quilt Block
    October 01, 2024
  • Gone Camping - Transportation Themed Quilt Block
    September 02, 2024
  • Quilted Tote Bag - Accessories Themed Quilt Block
    August 06, 2024
  • Book Lover - Books Themed Quilt Block
    July 02, 2024
  • Red Rocks - Mountain Themed Quilt Block
    June 04, 2024
  • Desert Poppy - Desert Themed Quilt Block
    May 07, 2024
  • Seaside Horizon - Beach Themed Quilt Block
    April 02, 2024

+Categories

  • View All
  • Applique
  • Binding
  • Blog Hopping
  • Book Review
  • Carrie Bloomston
  • Craftsy
  • Curved Piecing
  • Disney
  • Disneyland
  • DWRQAL
  • Fabric
  • Fabric Preparation
  • Foundation Piecing
  • Free Motion Quilting
  • Giveaway
  • Glow Stick Quilt
  • Glue
  • Glue Basting
  • Half Square Triangles
  • Hand Embroidery
  • Hand-dyed Fabric
  • Harry Potter
  • I Heart Ombre by V and Co.
  • Juki
  • Machine Piecing
  • Mickey Mouse
  • MicroFine Glue Tips
  • Mini Class
  • Mistakes
  • Mom
  • My Girlies
  • Ombre Fabric
  • Ombre Woven Stripes
  • One Little Word
  • Paper Piecing
  • Paperless Paper Piecing
  • Patterns
  • Personal
  • Piec-lique
  • Piecing
  • Podcast
  • Pressing Board
  • Quilt Block Mania
  • Quilt Blocks
  • QuiltCon 2015
  • Quilting
  • Quilting Matters
  • Reviews
  • Sewing
  • Sewing Machine
  • Shirts
  • Silk Society Stash
  • Silk Thread
  • Skirts
  • Spinning Seams
  • Star Quilt Block
  • Stitch & Flip Technique
  • Story Fabric
  • Straight Line Quilting
  • String Quilt
  • Sweet Boy
  • Tariffs
  • Teaching
  • Tie-dying
  • Tips & Tricks
  • Tools & Supplies
  • Tutorial
  • V and Co.
  • Video
Info & FAQs
  • Wholesale
  • FAQS
  • About Me
  • Contact Me
  • Terms of Service
  • Privacy Policy
  • Refund Policy
  • Do not sell my personal information
Sign up for our newsletter

Sign up to get the latest on sales, new releases and more…

My Mission:

"I care about teaching good technique to quilters because it gives them an amazing feeling of accomplishment."
~Cristy Fincher


Country

© 2025 Purple Daisies Quilting. POS and Ecommerce by Shopify

American Express Apple Pay Diners Club Discover Google Pay Mastercard PayPal Shop Pay Visa