Enjoy 20% off + a Free Pattern!
Aren't freebies the best?! Sign-up for my email list and I'll send a coupon for 20% off one order AND a free quilt block pattern right to your inbox.
(You can unsubscribe anytime.)
Plus, you'll be the first to know about new products, quilting tutorials, and exclusive discounts like
25% off the Pattern & Bundle of the Month
August 16, 2013 3 Comments
Piec-lique (pronounced: piece-li-kay) is a technique, developed by Sharon Schamber (my mama), for creating any type of curved seam. More than 10 years ago, She began developing the technique , and published her book, "Piec-lique: Curves the New Way", with AQS, in 2005. For those who have taken classes from my mom, or myself, the technique is often an "Ah-ha!" moment. We've seen eyes light up and minds open to so many possibilities for their sewing and quilting.
Sewing curved seams can be very intimidating. Most of the other techniques, out there, require special feet for your machine, plastic templates, many pins, and/or tic marks. All of which can be costly and tedious. Piec-lique requires none of those. It just needs you to be willing to give it a try.
Once you learn the basics of Piec-lique, you can apply the technique to ANY (yes, ANY) curved seam design in the sewing and quilting world. My mom has developed three ways to use Piec-lique: 1) Inset Curves (like the circle), 2) Layered Curves and 3) Paperless-Paper-Piecing (layered straight lines). You can find more info, and detailed, high quality instruction for all of these methods {here}.
Are you ready? Let's get started!! I know you're going to love this!
First up: Supplies
The Cast of Characters |
Trace! |
![]() |
As you're pressing, apply a good amount of pressure to make sure the layers stick, and any bubbles or ripples are flat.
Shiny Sides Down! |
After the two layers are pressed together, cut the center of the circle out, leaving the outside frame intact. Be sure to cut with smooth movements. Any bumps or gouges will show up on your fabric, later.
Our circle is cut and ready for the fabric!
Step 3: It's Fabric Time!
Cut a square piece of fabric that is a few inches larger than your circle. My circle is 4" across, so I cut my fabric at 8", but I would have been just fine with 6". We'll true up our block, making it the actual size you'd like, once we're done. You could cut your fabric to size now, but if this is your first time trying Piec-lique, I recommend giving yourself extra to work with.
Lightly starch and press your background fabric.
Finger press center creases into both your background fabric and your circle template. Draw a little line, or mark, on the creases of the circle template. This will help us center the circle, just right. If you want to play around, and off set the circle, go right ahead!
Line up your marks on the background fabric and template. Hold it in place, and press it, shiny side down, with your iron, to the back of your background fabric.
Press the template well, so it completely sticks to your background fabric. You should have no bubbles or bumps.
Step 4: Cutting Out Your Circle
Next, you'll cut the center of your circle out. This can be a rough-cut. Give yourself at least a 3/8" seam allowance, here. That extra width in the seam allowance will help give you more control when you sew. Once we sew it up, you'll be trimming it off, to make it a nice little 1/4" allowance.
Discard the center that you cut away, or add it into your scrap bin.
Next, clip the inside curve of the circle. We are going to be pressing this up and over the edge of the freezer paper template, and the clipping will allow it to open up, creating a nice smooth circle. When you clip, stop about 2-3 threads/fibers before the freezer paper template. If you clip too close, a pesky little hole will show up on your lovely circle.
Gauge your clipping, so the allowance will turn to make a smooth circle. Too far apart will keep your circle from looking smooth. Too close is hard to manage,when your pressing. Mine is usually 3/8", or a tad smaller, for a circle. The wider the curve, the wider my clipping.
Step 5: Starching the Seam Allowance
Spray some starch into a small cup, or bowl. I usually just use the lid of my starch can. It will probably foam up some. When the foam settles, the liquid will be left.
With your stencil brush, paint some starch along the inside edge of the seam allowance. It should be damp, not heavily wet. Paint it around the entire circle. You also paint on the starch a bit, then iron, then paint on more. Either way is fine.
Step 6: Pressing the Seam Allowance
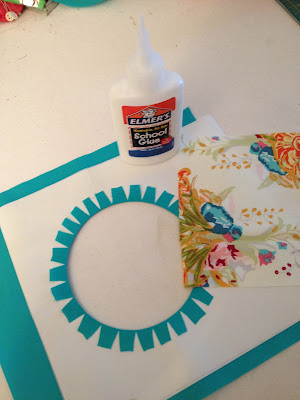
Be sure your iron is hot and dry. Pull back the little "tabs" of the seam allowance, over the top of the freezer paper. You'll feel when you "hit" the template. Don't pull on the tabs too much, to prevent the freezer paper from folding over, as well.
Press the tabs down, with your iron. Move around the circle, pulling over the tabs, and pressing them down. Slowly and smoothly.
When it's all pressed it will look a lot like the cog of a wheel. You should have a smoothly pressed circle, all the way around.
Step 7: Adding the Circle Fabric
Cut the fabric for the center of your circle. Since my circle is about 4", I cut a 5" square. The square doesn't need to be precise or cut perfectly. It just needs to be bigger than the center circle. I'm using Lilly Belle by Bari J. from Art Gallery Fabrics.
Remove the freezer paper. If you press it lightly with your iron, the wax of the shiny side will warm up, and release more easily.
Draw a fine line of glue around the circle, on the inside edge. See how close the edge I place it?
Place your circle fabric, right side down, and be sure it covers the seam allowance on all sides. Heat-set it in place with your iron.
Now for the big reveal! Turn it over, and take a look at your gorgeous circle!!!
Step 8: Sewing it all Together
Turn your circle back over to the back, and open up the crease you made when you starched and turned your background. See that crease you made by pressing the allowance over, and against the freezer paper? This is your sewing line! Awesome, right? It's like magic!
Place your circle on your machine, and get ready to do some stitchin'. Be sure that the tabs of the allowance, and the right side of the raw edge of the circle fabric are to the right of the foot. You will be sewing through two layers, just like when you piece normally. Line your needle up with the crease, and begin with your needle down.
Slowly stitch directly on the crease, going around the entire circle. I guide with both hands, using my left to keep the bulk of the background out of the way of the needle. If you catch the background under the needle, you'll get tucks and puckers. I used a 1.8/2 stitch length, here.
When you get back to where you started, backstitch a few stitches.
This is what the seam will look like.
Once it's sewn, trim the allowance down to 1/4".
Turn it over, and press out any creases made from the sewing process. Feel free to starch lightly, if you'd like.
Ta-Da!!!!!!!
Step 9: Truing Up Your Block
To true up our block, we'll be working from the center out. This will give you a much more accurate measurement.
The following instructions are for making a centered and square block. If you'd like to play around with your circle and cut it off center, or make it wonky, go right ahead. There are so many fun things you can do with Piec-lique circles.
First, mark the centers of all four sides. It's a good idea to mark at the edge, and a small mark closer to the circle. Our original mark will be removed, as we cut away the edges. The additional mark, will help us we true it up.
Choose a measurement mark on your cutting mat to center your block on. I chose the 5" mark, but you could choose the 10, or anything you prefer. Lay your marked block on your mat, and line up your verticle marks with the measurement you chose.
Decide how big you want your block to be. I wanted a 5 1/2" block, unfinished, so as I trim, I will be measuring 2 3/4" from the center out, to be sure my block is accurate at the end.
Cut the right side first. Line up your ruler, from the center line, to half of the measurement that you want your unfinished block to be. For example, my block will be 5 1/2", unfinished, and 2 3/4" is half. That will be my mark for cutting. I lined up my center mark to the 2 3/4"measurement on my ruler. Then cut off the side with your cutter.
Next, line up your ruler on the left side of your circle block, going out, from the center, the same measurement you cut before. For mine, I went out from the center 2 3/4". Then cut.
Turn your block around, line up the bottom of your block to a horizonal measurement line, to keep it square. Repeat the measuring and cutting process for the last two sides.
TA-DA!!!!!!!!!!!! You did it!! Once you get the hang of this technique, you'll be making circles, of all sizes, and making them really fast. Now, I can finish one circle in less than 10 minutes.
The Drunkard's Path:
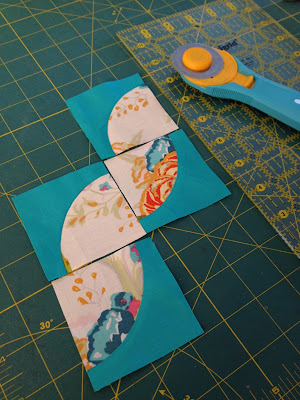
Turning your circle into a Drunkard's Path block is so crazy easy! There are only 2 steps. All you need to to is cut your circle in half, right down the center. Then cut both halves of your circle, in half. And just like magic, you have 4 Drunkard's Path blocks.
So freaking cool!!!
You can make a bunch of different circles, and cut them up to give you some scrappy Drunkard's Path blocks. There are so many layouts you can create with Drunkard's Path. I know you'll have a lot of fun with these blocks!
Thanks for stopping by! I hope you had fun learning Piec-lique.
~Cristy
**A note about freezer paper: If you use Renolyds, or another brand found at a grocery store, it will need to be preshrunk. When ironed, freezer paper shrinks in width (about 1/8"), but not length. Preshrinking it will prevent inaccuracies as you reuse the template. To preshrink your freezer paper, tear off your desired length, lay it shiny side down onto your pressing board. Lightly spray it with spray starch, and press it with a dry (NO steam) iron until it is completely flat and dry. Repeat for your second piece of freezer paper. You'll notice it pulling in on the width. Once it's dry and flat, it's ready to be used. If you order freezer paper from my mom, it doesn't need to be preshrunk.
April 22, 2020
Awesome instructions – very clear and concise! I’m just starting to learn quilting and want to make the drunkards path quilt design! Thanks sooo much for your instructions!
September 02, 2018
thanks! this is an awesome tutorial and I just linked it on my blog today.
Comments will be approved before showing up.
April 28, 2025
Have you been wondering about the what type of impact the new tariffs (coming May 1st) will have on your favorite quilting fabrics and supplies? There's a lot of info being thrown around and a lot of it can sound, well, scary. To give you some reassurance, let's have a chat about what I know and what you can expect from me and Purple Daisies Quilting…
December 03, 2024 1 Comment
Cora Latos
October 28, 2021
I was truly blessed to take Sharon’s class many, many, many years ago.. I would be so happy to take all of her classes again, just for the shear joy I had in her class ! Thank you !