Country

  • Log in
  • Cart (0)
  • Checkout
Purple Daisies Quilting specializes in classic, modern, and colorful fabrics, patterns, and quilt kits for quilters of all skill levels. You'll find all of the V & Co. Ombre fabric collections here! We're home to patterns by Sharon Schamber
  • Blog 
    • Visit the Blog
    • Newsletter Sign-up
  • Fabric 
    • New Fabrics
    • Quilt Kits
    • Seasonal Bundles & Kits
    • Destash Clearance Sale!
    • All Fabric
    • Fabric Bundles  
      • NEW! Fat Eighth Bundles
      • Jelly Rolls
      • Fat Quarter Bundles
      • Half Yard Bundles
      • AGF Precut Bundles
      • Hand Dyed Bundles
    • Fabric Collections 
      • Pure Solids by Art Gallery Fabrics
      • Ombre {Original} by V & Co.
      • Ombre Confetti by V & Co.
      • Ombre Fairy Dust by V & Co.
      • Ombre Galaxy Metallic by V & Co.
      • Ombre Wovens by V & Co.
      • 108" wide Ombre Confetti Backing Fabric by V & Co.
      • Ombre Bloom by V & Co. - 30% Off!
      • Moda Bella Solids
    • Fabric Designers 
      • V and Co.
      • Sharon Schamber
    • Fabric Manufacturers 
      • Moda Fabrics
      • Art Gallery Fabrics
      • Sharon Schamber - Hand Dyed Fabric
    • Fabrics by Color! 
      • Rainbow
      • Red
      • Pink
      • Coral
      • Orange
      • Yellow
      • Green
      • Aqua
      • Blue
      • Purple
      • Grey/Black
      • Neutral
      • Brown
    • Hand Dyed Fabric 
      • Hand Dyed Precuts
      • Hand Dyed Bundles
      • Hand Dyed Scrap Packs
    • Coming Soon - Preorder
    • Discontinued Fabrics
  • Patterns  
    • New Patterns
    • Quilt Kits
    • Seasonal Quilt Patterns
    • All Patterns
    • Patterns by Designer 
      • Alison Glass
      • Color Girl Quilts
      • Cristy Fincher
      • Emily Dennis - Quilty Love
      • Krista Moser
      • Latifah Saafir
      • Laundry Basket Quilts
      • Laura Heine - Fiberworks
      • Lo & Behold Stitchery
      • Lori Holt
      • Modern Handcraft
      • Needle in a Hayestack
      • Pen + Paper Patterns
      • Sharon Schamber
      • V & Co.
      • Violet Craft
      • Nydia Kehnle
    • Patterns by Type 
      • Collage Quilts
      • Cross Stitch & Embroidery
      • Curved Piecing
      • English Paper Piecing
      • Foundation Piecing
      • Machine Piecing
      • Tote Bags & Purses
    • Applique 
      • Raw-edge Applique
      • Turned-edge Applique
    • Quilt Block Mania
    • 2019 BOM - The Gardens
    • 2018 BOM - Stellar Stars 
      • Stellar Stars - BOM Pattern
      • Fabric & Thread Kits
      • Stellar Stars BOM Supplies
      • Stellar Stars - Video Tutorials
    • 2017 BOM - Silk Society Stash 
      • Hand Dyed Fabric
      • Applique Patterns
      • Silk Thread Sets
      • Video Tutorials
    • Quilt Binding
    • Printed Quilting Patterns
    • Quilt Designing
    • Quilt Painting
    • Books
    • Hand-dying Fabric
  • Notions 
    • New Notions & Supplies
    • Fun Stuff!
    • Glue Basting
    • Thread 
      • Thread Sets
      • Cotton Thread
      • Soie Perlee - Embroidery Thread
      • Soie de Paris - Embroidery Floss
      • Specialty Threads
    • Cutters & Rulers
    • Pins & Needles
    • Pressing Boards & Irons
    • Marking Tools
    • For Machine Quilting
    • For Applique
    • For Curved Piecing
    • For Foundation Piecing
    • For Machine Embroidery
    • For Color & Design
    • Shop by Brand 
      • It's Sew Emma
      • Gypsy Quilter
    • Monthly Clubs
    • Preorder Class Kits
  • Free Motion Quilting 
    • Longarm Machine Quilting
    • Longarm Digitized Designs
    • Domestic Machine Quilting
    • Video Tutorials
  • Digitized Designs
  • Online Courses 
    • Course Login
    • Unique Feathers with Sharon Schamber
    • Love Machine - Precise Piecing Course
    • Book a Class - Guilds & Groups
  • Country

Blog
Home   Blog   Let's Face it, it's a Binding: Facing a Quilt Tutorial

Let's Face it, it's a Binding: Facing a Quilt Tutorial

Binding Tutorial

March 25, 2013

Binding a quilt is that last little special touch that a quilter puts onto their quilt. A faced binding, aka invisible binding or non-binding binding, is a great way to bind a quilt to show off a more "arty" or modern look. The faced binding takes you right to the edge of the quilt, and gives the quilt a really clean and finished feel.
My friend Alyssa, over at Pile O Fabric, was facing the "facing" technique delimma, and I took it on as a challenge. I set out to try my own idea for facing a quilt. Of course I consulted with my mom about how she would go about making a faced quilt. I was super tickled when she told me what she would do to make it, and it was just what was running around inside of my head. My favorite part of this technique is that you can finish it by stitching it down by hand, OR (hold on to your hats!!) by machine, and get the same look. Hard to believe, right? It's so fabulous!!

I tried several different ways to make the facing binding, and after all my trial and error, I think I have something pretty great to share with you. If you've done a faced binding before, some of this is probably familiar, and I hope you learn something new today. And if this is your first attempt, I really hope I've helped make this type of binding a bit easier for you.

Let's get started! First up: Supplies.
  1. Your quilt, trimmed and squared. 
  2. Fabric for the facing. Depending on the size of your quilt, you'll need 1/4"=1/2" yard.
  3. Rotary cutter, ruler, and mat.
  4. Scissors.
  5. Basting Glue, with a Fine Tip.
  6. Cuticle Stick.
  7. Hot, Dry Iron.
  8. Spray Starch. 
  9. Poly Monofilament Thread (I recommend Sulky Invisible or YLI)
  10. Schmetz Embroidery Needles, 75/11 
  11. Hand Needles, Rubber Thimble, Thread

Step 1:
Lightly starch and press your facing fabric. I prefer to spray one side, flip over the fabric, and press it from the other side. This keeps my iron cleaner, and stops those icky white flakes from getting on my fabric. Repeat 1-2 times on each side of the fabric.

Step 2:
Cut your strips at 2" wide. The number of strips that you'll need depends on the size of your quilt. If you need to piece strips together to cover the length of the sides, I recommend cutting the ends at 45 degrees, and piecing them like you would bias strips, or as if you were making a traditional binding. For your viewing pleasur, here's a {video} from my mom, demonstrating it.
Step 3:
Let's glue those strips on! Glue basting the strips onto your quilt keeps them stable and accurate. You won't have any shifting, while you sew. And best of all, you don't have to spend your time putting the pins in, or stopping in the middle of your sewing to take the pins out (or heaven-forbid, sewing over the pins). Rest-assured, the glue will wash out, and because we're heat-setting, it's perfectly safe for your sewing machine and needle.
Draw a fine line of glue on one edge of your quilt. Be sure to draw it on the inside edge of your 1/4" seam allowance.
Place your strip on up to the edge of your quilt, right sides together. Your strips are probably longer than they need to be, and any overlap at the top/bottom of the quilt, is fine, at this point.
Heat set the glue with your hot, dry iron. No steam, please. You want the glue to dry, and steam will keep it moist. Give the iron a few extra seconds to set the glue. It has a couple of layers of quilt and fabric to heat through, in order to get up to temperature. If it doesn't set on your first press, do it again, for a few seconds longer.

Once you've heat-set the first strip, go ahead and cut off any overlapping fabric, right up to the edge of your quilt. Of course you can measure the length/width of your quilt first, and precut your strips, but I don't think that extra step is necessary. This way ensures that it will be super accurate.
Repeat this step on the opposite side of your quilt. You'll end up with two strips glued onto parallel sides of the quilt.
Step 4:
Turn and press down about 1/4-1/2" of the edge the facing. Specific measurements aren't vital, with this. Just be consistent on all sides. Here, you can use a little starch or steam to get that nice crease. Repeat for both sides.
Step 5:
Disclaimer: When I took this pic, I forgot to press the facing that is underneath the top one. (I was excited, and maybe rushing a bit.) Please pretend it's turned and pressed.

And moving on...

Next we'll add the last two strips of facing. These are going to lay on top of the first two, and are going to be 1/2" shorter than the first two facing strips. Glue and heat-set your next two strips. Then cut them off, at both ends, a 1/2"from the top/bottom. It will look like the pic below, except you'll have that first facing turned and pressed (wink, wink).
Step 6:
Once you have your last two facing strips glued on, turn the edge over, and press it as you did on the first two strips.
Here's what it will look like after all 4 sides have been turned and pressed. So pretty.
Step 7:
Stitch your facing strips down, with a 1/4" seam allowance. Start at the top of one side, and sew all the way down to the bottom. Then start again at the top of the next side. This helps reinforce, and secure the corners, and ensures that your corners will be as square as possible.
Step 8:
After all four sides are sewn, go back and stitch across each of the four corners; sewing across the intersection of the seams, on the diagonal. This will reinforce the corners, for turning them right-side-out. This is uber-super important. On the first quilt I did this technique with, I didn't sew across the corners, and well, my stitches didn't hold, and I ended up with a hole in the corner. Not fun. I don't recommend it.
Step 9:
Clip your corners off, just a teeny tiny bit past that diagonal seam.
Step 10:
It's time for the big reveal! Use your thumb and fingers to push the corners right-side-out.
 Lookin' good!!
Use that little cuticle stick to help push the corners into place, and get them nice and square. Be careful here, not to push the corners out too much. That will make the corners wing out, and although our quilts are pretty fabulous, we don't need them to fly.

Once you get your corners turned, go ahead and lightly press the facing down all around the quilt. You're just looking to flatten it a bit, here, and get all the facing strips to behave.
Step 11:
Now we're going to secure the facing for stitching it down, either by hand or by machine. The prep is the same, regardless of which technique you choose for finishing.

Draw a line of glue on the inside of the facing. The glue should be at 1/8"-1/4" from the top of the turned edge. I applied the glue with the quilt flat on a pressing surface, and drew the glue on the inside of the facing, from underneath. As well, I applied it by tucking the edge of the quilt under, so the facing was flat. Either way worked well.

Be sure to start with the bottom facing strips that are under-lapped. Glue those two down first, then glue the top two overlapping facing strips.

Once you have the glue drawn on one side, hold with one hand, and press along the facing with your hot, dry iron, with the other hand. Like at the beginning, give the iron and glue a few seconds to get up to temperature, through the layers of the facing and the quilt.
Repeat the gluing/heat-setting on the last two sides, and get ready to sew!
I think this is looking great! And it's not even sewn yet.

Hand Stitching:
If you'd like to sew by hand, the quilt is all ready for you. And the best part is, there are no pins to worry about! The little bit of time you took to glue it down, will keep the facing secure the entire time you're stitching. No clips, pins, or other contraptions. I think I hear angels singing.

For hand-stitching I prefer a 50wt. cotton thread (DMC, Aurifil), Bohn Milliner's needles size 10, and a Bohn rubber thimble for pulling my needle (I wear it on my pointer finger). You can also use a thimble for pushing your needle, which I usually wear on my middle finger.
Here's a {video} of my mom demonstrating how to sew a binding back by hand. Her method is fantastic. The stitches are almost invisible, when you stitch it down with the ladder stitch, which is what is demonstrated in the video. It's much more invisible than other stitches, and looks very professional.

Machine Stitching - Here we GO!:
You're probably thinking that there's simply no way to stitch this faced binding down, from the back, without leaving an ugly, and unwanted, sewing line on the front of the quilt. Let me tell you, it IS possible! 

My mom, as you probably know, is a sewing and quilting genius. Her mind works in astounding ways. She recently developed a Quilt As You Go technique for embroidered quilts, and the method she uses for finishing the quilt, from the back side, without sashing strips, is revolutionary. I took that technique, and adapted it for sewing down the faced binding. Trust me, it works. Like with anything new, there will probably be a bit of a learning curve. Be patient with yourself, and practice. After the second or third go at it, you'll be a pro!

Step 1: 
Set up your zig-zag machine for a small, like super small, zig-zag. I set mine for a 1.0 stitch width (tiny, right?!), and 1.3 stitch length. Set your top tension to zero. I have a Bernina, so I also thread my bobbin thread through the wing on the bobbin case. Please use a good embroidery needle, like Schmetz. Embroidery needles are ball-point, and will not splice through the fibers of your quilt. That splicing leaves holes, which will rear their ugly little heads over time and with wear.

In order to keep that sense of invisibility, the right thread choice is really important. I only recommend a poly monofilament (Sulky or YLI). No rayon (it doesn't hold up to heat, time, and use like a poly does). I use the monofilament in the top, and the bobbin.

We will be sewing from the backside of the quilt. Start with the under-lapped side of the facing. We don't want to start with the overlapped side, that way we don't sew over the side that needs to be sewn first. 

Step 2:
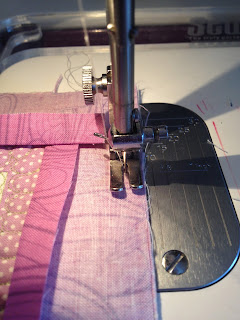
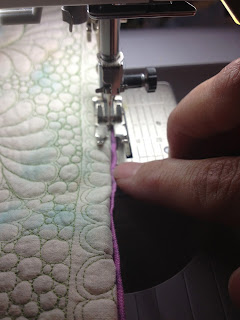
Fold the facing, under, so only about 1/16" of the edge of the facing is peeking out from the edge. Place your quilt under the foot, and roll down the needle to check for placement. The key here is to catch just the edge of the folded side of the quilt, so only the fabric on the back of the quilt gets stitched through. Advance the needle one more time to make sure it zags over the edge of the quilt and onto the facing. The needle should be just on the inside edge of the facing, and shouldn't go over the edge.

A a little "foot" note: You probably noticed that I'm using my 1/4" foot here. The zig-zag I'm making is tiny enough, that I can use this foot easily. I like it because I get more control than when I tried this technique with my zig-zag foot. If you'd like, you can also try using a hemming foot.

Once you have that set, you're ready to sew it down. Starting at the corner of the underlapped facing, sew down a couple of stitches, and backstitch. Carefully, and slowly sew down the entire side of the quilt and facing. Be sure to only catch the very edge of the quilt side of the zig-zag. 2-3 thread fibers is a good gauge. When you get to the corner of the under-lap, backstitch again. 
Please take your time, and start this part slowly. Once you get the hang of it, and get the feel for where the needle needs to hit on the zig and the zag, you can speed up a bit.
If you stitch too far on the inside of the quilt side of the zig-zag, you'll end up with a teeny tiny stitch on the front side of the quilt. A few of these is expected, when you're beginning. And they'll barely be able noticable (except, maybe by you ;) ).

If, while you're sewing, you see that the edge of your facing is glued too close to the edge, give it a little scrape with your fingernail to release the glue. You can do this as you go, because you're sewing slowly.
Step 3:
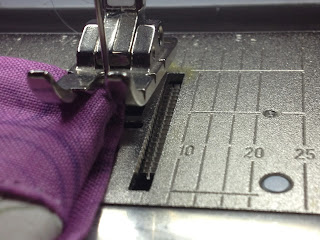
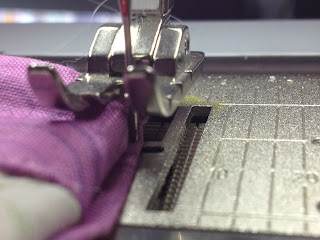
Stitch the overlapping sides of the facing, last. Fold it under, just like with the first two side, and position under your foot. The beginning and end of these will be bulky, but if you're going slow, you and your machine will be able to handle it.

In these pictures, you can see pretty clearly where you're needle is going to hit on the zig and zag. be sure to backstitch at the beginning and end.


Step 4:
Clip all of your threads, and give your facing one good, last press.
 Here's what my finished facing looks like, on the back.
And a close-up of a corner.
 And here's the pretty front side:
I just love how this works! There are no sewing lines on the front! It works, it really really works!

I hope you've enjoyed this tutorial. Please let me know if you have any questions. Feel free to ask them in a comment, below, and I'll answer you ASAP.

Thank you for stopping by, and I can't wait to share more with you soon.

~Cristy


Tweet Share Pin It Email

Leave a comment

Comments will be approved before showing up.


Also in Blog

Corner Star Quilt Block

December 06, 2022 1 Comment

FREE Pattern

Quilt Block Mania - December 2022

Continue Reading

Blooming Meadow Quilt Block + Tutorial
Patterns Quilt Block Mania Quilt Blocks Spinning Seams Tutorial
Blooming Meadow Quilt Block + Tutorial

November 01, 2022 2 Comments

Quilt Block Mania - November 2022

Continue Reading

Guinea Pig Quilt Block
Blog Hopping Quilt Block Mania Quilt Blocks
Guinea Pig Quilt Block

October 03, 2022 1 Comment

Quilt Block Mania - October 2022

Continue Reading

Info & FAQs
  • Wholesale
  • FAQS
  • About Me
  • Contact Me
  • Terms of Service
  • Privacy Policy
  • Refund Policy
  • Do not sell my personal information
Newsletter Sign-up

My Mission

"I care about teaching good technique to quilters because it gives them an amazing feeling of accomplishment."
~Cristy Fincher